ABC's

Sunday, June 26, 2011

Crystal Week: Part 2!!

The rest of the experiments for crystal week dealt with over saturation.

Please note what I mentioned before, frugality and over saturation do not combine. By frugality, I mean ridiculously frugal, these ingredients are not expensive, Epsom salt, sugar? Live a little, please!

What is done is done though, for now, one day in the future we will try and succeed in these experiments. Like Strawberry Shortcake says, "You can't not try." Which I roughly translate to you have to try and try and try and try and then try some more. Then give up for a couple days and go back and try again. My blind confidence that things will work has always lead me to interesting results.

Growing Rock Crystals! 
Rock crystals, if you haven't heard of them, are sugar crystals, they are a great example of over saturation  of sugar in water. I was a little hesitant about having a bunch of super sugary water hanging around the house. Not because the cat, dog, husband or Aimee might drink it, but because a long time ago I heard it attracted cockroaches....I just googled this theory, I couldn't find anything. It says they are attracted to sugar and drink water, so I am sure they wouldn't mind a time saving combination of the two. WE did not have any problems or attract any kinds of bugs with this experiment.

I grew rock crystals once when I was a kid and I have had them multiple times before. I do remember the growing being somewhat successful and eating them being somewhat delicious. The are supposed to end up looking something like this;


Layers upon layers built up on each other. Beautiful. Delicious. Crystallized sugar on a stick, what more could you want? Since I hadn't made these in so long I looked around the Internet for some directions/instructions. I ended up using the about.com version. 


First you start with; sugar, water, two glasses or cups, string (cut long enough so it is not touching the sides or the bottom) food coloring and pencils. Mistake! I wasn't really thinking about it and used glitter pencils. That is fine, however most glitter contains a teeny, tiny, almost, but really not enough to worry about, amount of lead in it. After I realized this I knew we would not be eating these crystals. SO please use a regular old fashioned #2. Or a Popsicle stick. Or anything that will hold the string.


We used the sugar and cream brand of string. It is a cotton string with a nice ply. We had some laying around from a project I am making Aimee. I thought the name fitting.


Dissolve the sugar in the water, stirring it constantly and bring it just to a boil. Don't over cook it or else it will get too hard. We added the food coloring after it was done cooking, but before we cooled it. You have to cool it for a long time. I took pictures, but then decided it would be best not to post pictures of the inside of my refrigerator.
After the sugar/water solution is cool you need to dip your string in, to promote a starter crystal to form on your string.


The liquid is pretty thick. So we found it a little hard to keep the string straight. About.com suggested using something to weight your string, but of course something non-toxic like a life-saver candy. We didn't have any. I am not sure if I count this as a mistake. We separated the solution, mainly because all of it wouldn't fit into one cup and coloring one pink and one yellow. 


Cover with a coffee filter or something similar and wait. And wait. And wait. Usually it is only supposed to take a couple of days.

Crystals might form on top of the 
water solution. You can go ahead and take these out with a spoon. This happened after a few days with both of our glasses.


After a couple more days we noticed that crystals had started forming on the sides and bottom of our container. The instructions noted to transfer to a new clean cup if this started to happen. The good news is we started to see lots of activity on our strings. We definitely got a starter crystal going. The bad news, our cups had crystallized in the worst way. I wish I could tell you what mistake I made, so you would be so fortunate not to make the same one, but I have no idea what I did wrong. I figured it was just the way it was and we made a new batch of sugar water, since we didn't have enough after the crystallizing.


That is a hot mess of crystals. The even worse news, we didn't have a dishwasher, so these babies had to soak and soak and soak. That should be a requirement for this experiment. String, glasses, dishwasher, sugar, etc.


Here is our second batch of mix. We tried to even things out this time. We put the mix and strings with starter crystals on them in clean cups and waited again.


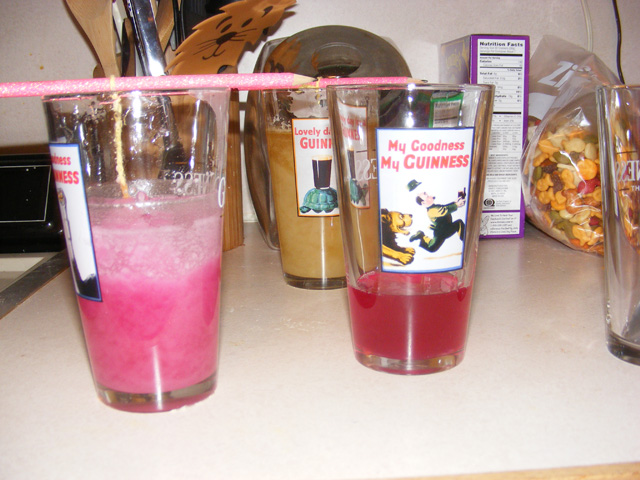
Even though the crystals did get a lot bigger, they were not forming as well as I thought they should. There wasn't any of the BIG rock type formation I was expecting. It was very grainy and very small. This time the crystallization in the cups worsened. The entire liquid, except for the small portion on the right was all crystallized and stuck to the glass worse then the first time. It happened with the yellow also.


After this, I was unsure of what to do. Not willing to quite give up, but definitely not willing to make another batch of the sugar water mixture (we had already used six cups, almost a whole bag) we put the strings in the remaining clear mixture and waited a little longer.


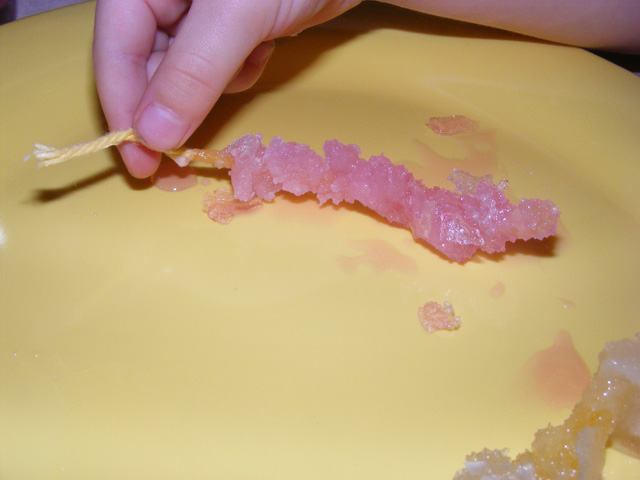
Amazingly enough, after about the same amount of time as the previous cups, there wasn't as much crystallization in the cups. A little on the bottom and a little crust on the top. However the crystals on the top part of the string did start to degrade and come apart. Sigh.


Not too bad. I guess. After this though, we called it, well not quits, but we left the experiment open. Hopefully to come back to it at a later time when we are a little older and wiser. Then we will make awesome huge rock crystals. Instead of these.


All things considered, it was pretty cool that something did form on the strings. Looking at the pictures, they do look pretty cool. I think when I wasn't looking Aimee might have snuck in a lick, but otherwise, we mainly just looked at them for a couple of days. This experiment took a while and I wasn't sure how I felt about her eating them after how long they had been sitting out.
It is definitely an experiment worth trying again and again and again.

Stalactites and Stalagmites
Our next experiment came from one of our books. It looked pretty easy and pretty cool so I thought we could give it a try.


Here are the ingredients.


2 jars, water, epsom salt 16 oz., a spoon, scissors, 2 nails, a pan or sturdy paper plates, yarn.


Start by filling the jars with water and then adding the epsom salt a spoonful at a time. Until you literally can not add any more, it just will not dissolve. PLEASE ADD MORE THEN YOU THINK IS, WAY MORE THEN ENOUGH. Mistake! I stopped once I got through a 1/4 pound of salt for each glass. In other words, I only used half of the box for both jars. I probably could have and should have doubled that amount.


Next tie one nail to each end of the yarn/string. You want it to be long enough to drape over close (about a couple of inches above), but not touch the plate. Put the one nail with the string in each jar and adjust the distances. Now wait.  
Mistake! I used a thick yarn that I had laying around the house, I think this yarn would have been okay, had it not been so wavy. I believe the whole string is supposed to get wet, though ours never did. If you look at the picture in the book, the string they use is pretty thick. Also the length/distance of the string and that above the plate is different then the directions specified. 


We waited for a 3 or 4 days and almost nothing happened. Our plate did get wet, the bottom of the string was wet, but the whole string wasn't. Dried epsom salt showed up on the edges of the jars and the plate, but that was about it. According to the book a lot was supposed to be forming at this point. A little beside myself with frustration, I blamed the string and we tried again. 


Our second attempt yielded even less of a result. We kept it up for a little longer and still nothing occurred. This is when I decided the problem was mainly the lack of epsom salt. We will definitely do it again and use a lot more epsom salt, I mean honestly, it is like .89 cents for a pound. For pete's sake. 

I think it is evident how I felt about crystal week, but what about Aimee? She had fun for the most part, she loved the Dora experiments the most. Everything else was a little or a lot above her. She did a great job paying attention and tried really hard, but the lack of results combined with the over complecity of the whole thing was a little much. She hasn't talked about it as much as she has the other weeks that we have done.

Happy themeing!
More weeks of fun to come soon!

Thursday, June 23, 2011

Crystal Week!

Crystal Week. Such promise, such hope, such beauty. The idea for crystal week all got started back when Aimee saw a Dora the Explorer Crystal kit. One in which you could make your own crystals, it had different packets and test tubes! She loved it instantly, I waited a couple of weeks and then thought, might as well, we could make it into a week theme. If anything we will own a pair of sturdy test tubes, which could definitely come in handy later. 

We got the kit and jumped head first into crystal week. The Dora kit worked great, I have pics and explanations further down. Everything else we did, did not go as well. Crystal week turned into crystal two weeks and experiments were repeated multiple times. Here are a couple of things I learned. 
*Crystals are a huge topic, one that needs a lot of basic information to fully understand. 
*Crystals can and should be simplified for the younger audience. I didn't think of this at the time. 
*Over-saturation and frugality are two things that do not combine. 
*Crystals are a big topic. I think I said that already, but really.
 *It is a more advanced topic so all the projects you do are fun, but it is hard to get through to what is really happening.


~Books~
Fiction; (I was slightly disappointed that I couldn't find more stories about crystals at my library, these were the three main ones, hopefully you have better luck).
Dora the Explorer Crystal Kingdom Adventures Ready to Read level 1- This is a nice version of this book, some of the words are replaced by pictures of the word. It helps the child to refer to the words that make the story and lets them be involved in reading the story. 
Dora the Explorer Dora Saves the Crystal Kingdom- This is the longer version of the previous story. It is has more elaborate details to the base story and is going to be more like the version they play on TV. 
The Crystal Mountain by Ruth Sanderson-This is a longer story but good. Not much significance for crystals, past crystal mountain which is the main destination in this story. This did have a lot to do with weaving, though, which was nice, it brought up an old topic.  In a nutshell though, a mother weaver and her three sons make a living selling the mothers woven cloths. One night she dreams of a beautiful place and knows she has to weave it. The youngest most artistic son is the most supportive. Years go by and it is finally finished, but is taken by the wind. Though the three sons set out it is the youngest with the most determination to find it. It is on top of crystal mountains with the fairies. They make a replica and give it back to him, not before one fairy weaves herself in. With the boys mother unwinds the cloth it becomes real and the son and the fairy (now human) go off seeking adventure. (sorry that wasn't much of a nutshell). 


Non-fiction
Growing Crystals by Ann O. Squire- This book was an essential introduction book to crystals. A little long winded; it showed where you could find crystals and simplified their structural make up. Great for earlier elementary explanation. 
Geology Rocks! Crystals by Rebecca Faulkner- This is a step up from the first book mentioned. A little more in depth but very well and simply written. This would be a great companion book to the first or fabulous by itself for the upper elementary age. 
Experiment with Science Just Add Water- We only did one project from this book, trying to make stalacites and stalagmites. All of the experiments would be great for young kiddos started age 3. Though a lot of them, if not all need assistance and explanation, they are all written with great instructions and clear directives. I really like the way this book is laid out. 

There are two more books we looked at but didn't read. They are pretty in depth and lost my daughter after the first page. Here are the names.
Crystals and crystal gardens you can grow by Jean Stangl- This was a very good resource, however way too advanced for what we wanted to do. It would be very good to use for projects.
Eyewitness Books Crystal & Gem- We absolutely love all of the eyewitness books. Though they are a little beyond our reading patience, they pictures are wonderful. There is an Eyewitness video series and most of the books have a condensed video edition. These are our favorite and we have been watching them ever since we let Aimee start watching TV. She enjoys them thoroughly and they allow enough information to strike interest and promote further investigation.  

~Projects~
  

Here it is! The beloved kit! Note how it says 'my first' we should have stopped there. I think if we had just done this kit for the week that would have been more then enough. There are a ton of different crystal kits, Aimee and I were at a toy store the other day and saw so many different kinds. So I am torn, usually for these projects and themes I try and stay away from kits, but for crystals, some DNA and other types of matters, like butterfly growing. I feel a kit is best to start with and go from there. The kits are often easier also, everything is laid out in front of you and ready to go. Fairly fool proof, looking at my stat-record of mistakes I should probably use kits more often.


This is what came in the kit; instructions, vegetable oil, glitter, a pack of water absorbent crystals, color tabs and test tubes with holder.


First thing on the list, take a color tablet and dissolve it in water. One for every color, there were three.


Standard primary colors; yellow, red and blue.


We spent a while talking about colors and color combinations. When the test tubes were held up to the window or a light, they would look like this.


Next up, mix some of the vegetable oil with water and note what happens. Then add a color tablet. It was pretty cool. After that we did made a 'wand'.

Bottled magic.


After playing with colors for as long as you want, take the water absorbent crystals and place them in water for a color of hours. They start out pretty small. Like sea salt.


The get a lot bigger. At this size you can play with them and explore them. They are no longer hard but very soft and smooth and slightly squishy, but it is hard to actually squash them and take them apart. 


We put these crystals out in the 'sun' to see what would happen. They shrunk down to almost their original size. (This picture was taken a little ways into the project). If you had a ton of sun though I am sure all the water would evaporate and they would become the tiny rocks again. After they were completely shrunk, we took two or three of the crystal and put them in a test tube filled with water.


For 24 hours. They got to be pretty big.
That summed up the Dora project. The kit itself came with a ton of supplies though, we still have a lot of everything left over. Eventually it will be good to go back and do different experiments. Like what would happen if you put the water crystals in colored water, would the crystals change color? If so would they stay that color after the water evaporated?
Overall, I really liked the Dora kit. It was set up so there is some time in between each project, we did the whole thing over 3 or 4 days in fact. There was a lot of time to talk about what was happening and for her to make observations about changes.

Crystals around the house!
Our next project involved looking around the house for various crystals.We only found a small amount but there are so many laying around the house! BE CAREFUL when distinguishing what crystals are food and what are not. Sprinkles, sugar salt = great crystal food. Epsom salt, cleaning salts, etc = fun experiment gone terribly terribly wrong. This didn't happen to us, at this point we didn't have any crystals that weren't food, but I had this terrible thought while blogging and thought it best to toss it in.


We found, seasoned salt, sugar, sprinkles, (which is just colored sugar), sea salt and table salt. Aimee did a taste test of all of them when I wasn't looking, which is why there are a lot of little holes in them and also why we didn't really look too hard out of the kitchen for other crystals. (see above warning). She investigated them and we came up with this drawing to try and make things easier.


We are pretty good at our shapes around here, but we really haven't gotten into 3-D shapes yet. So it was kind of hard to explain to Aimee how the integral structure of crystals is based on very precise, repetitive geometric patterns. They build and build on each other in, theoretically, very straight lines. We have talked a lot about bubbles before and why they are shaped the way they are, all the molecules pushing out to the edges, making it a circle. So I thought I could try to explain the crystals structure. I definitely lost her. I tried again. Lost again. I wasn't disappointed, just frustrated with myself for not really knowing an easier way to explain it to her.

This is part one of the crystal blog. This is the part where much of this week was successful. Part two will show all the fails that occurred that week and the following week and a half after. I had to post though, just in case anyone ever tried something and failed, then failed again, then finally gave up because they had already used two bags of sugar and they knew if they boiled any more sugar to make the syrup it might be harmful to our bedtime routine.